Connect WhatsApp Business manually with your own credentials
Manual setup reveals phone number ID, business account ID, secret and app ID, for when your provider needs them by hand. The webhook becomes your job.
Manual setup exists for the case where you already hold WhatsApp Business API access through a BSP, or where your Facebook login cannot authorise the account directly. It reaches exactly the same connected channel as the sign-in route.
The important difference is not the four fields — those are copy and paste. It is that the webhook becomes your responsibility. Convarza gives you a URL and a verify token; something on the provider's side has to be configured to call it. Skip that and you get the classic symptom: outbound works perfectly, inbound never arrives, and nothing anywhere reports an error.
Before you start
- Your phone number ID and WhatsApp Business Account (WABA) ID.
- A permanent access token, not a temporary one.
- The app ID.
- Access to your provider's console, to register the webhook.
Steps
Add a WhatsApp channel and open Manual setup
Manual setup is revealed on the same pane rather than being a separate flow. You can switch to it after trying sign-in without starting again.
Enter the phone number ID
This identifies the specific number, not the business. Copy it from the provider's console rather than retyping — it is long, and one wrong digit produces a channel that authenticates and then does nothing.
Enter the business account ID
The WABA this number belongs to. Templates are owned by the WABA, so this is the field that decides whether your templates appear on the channel later.
If you connect successfully but the templates card is empty, come back and check this value first.
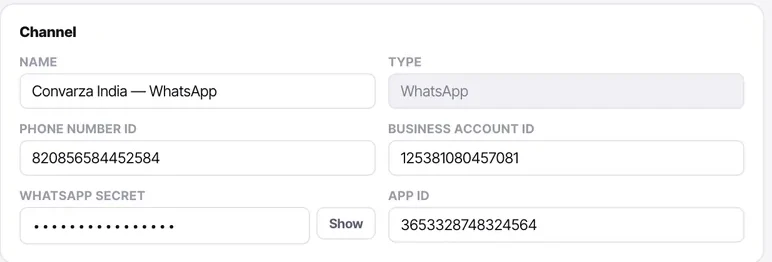
Enter the WhatsApp secret and app ID
Secrets are masked with Show so you can verify a paste. Use the Show toggle — a trailing space in a pasted token is invisible and produces an authentication failure that looks like a wrong token.
Use a permanent token. A temporary one will connect happily and stop working within hours, which reads exactly like an outage and wastes an afternoon.
Register the webhook on the provider's side
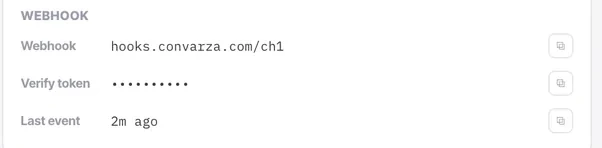
Copy the webhook URL and the verify token from the connection card and paste both into your BSP or Meta app. Subscribe at minimum to message events; delivery and status events are what make the Inbox's sent/failed filter meaningful.
This is the step that is genuinely yours on a manual setup, and the one that is skipped.
Choose what answers, then test inbound specifically
Send a message to the number from your own phone and watch "last event" update. Outbound working proves nothing at all about the webhook.
Check it worked
Diagnose in this order if something is wrong:
- Connection card not green → credentials, most likely the token.
- Green, but "last event" never updates → the webhook is not registered, or it is subscribed to no events.
- Everything green, templates missing → the business account ID.
The parts people get wrong
- If your access token is rotated on the provider's side, the channel breaks silently. Whoever rotates tokens needs to know this channel exists.
- The verify token is not the access token. It is the shared string the provider echoes back when registering the webhook.
The ones people actually ask
The channel connects, but the templates card is empty.
Check the business account ID. Templates are owned by the WABA, not by the number, so a wrong or mistyped business account ID gives you a channel that authenticates perfectly and shows no templates at all. This is the single most common cause and it is worth checking before anything else.
Authentication fails but I am certain the token is right.
Two usual causes. First, a trailing space on a pasted token — invisible, and it produces a failure that looks exactly like a wrong token. Use the Show toggle and check the value ends where you expect. Second, a temporary token: those connect happily and stop working within hours, which reads like an outage. Use a permanent one.
Outbound messages send but nothing arrives inbound.
The webhook is not registered, or is subscribed to nothing. On a manual setup that half is yours — Facebook sign-in channels handle it for you, manual ones do not. Copy the webhook URL and verify token from the connection card into your BSP or Meta app, subscribe to message events at minimum, then send yourself a message and watch last event update.
Should I use manual setup or Facebook sign-in?
Sign-in, unless you cannot. It fills every credential for you and registers the webhook, which removes the two steps that generate most of the failures above. Manual setup exists for businesses working through a BSP whose numbers are not reachable by sign-in, and it puts the webhook back in your hands.